Windows 10 has a built-in feature to check which graphics card is installed on your PC, but it won’t work on Windows 8.1. If you want to know why, you can check out this article.
A graphics card, or GPU, is a computer component which handles the bulk of graphical information for a computer. This is usually done as processing of graphics data, such as rasterization of 2D and 3D graphics, via a dedicated processor.
You may have always wanted to play a certain game on your Windows computer, whether it’s a desktop or a laptop. It is essential to have a GPU capable of playing a certain game, whether it be a dedicated or integrated one.
A graphics card is a piece of hardware that aids in the production of pictures in a frame buffer with a display output. The GPU is well-known among gamers and others who utilize GPUs for rendering and other FPU-intensive activities. If you don’t know anything about it, here’s a tutorial to help you figure out what GPU is installed on your Windows 11 computer.
Nvidia and AMD are the two major specialized GPU manufacturers at the moment. Intel and AMD are the two companies that make integrated GPUs. Of course, both kinds of GPUs are different, therefore their performance will vary. If you’re at a shop or searching for a used machine, knowing what GPU it has will be useful if the specialized GPU software isn’t loaded. So, if you’ve ever found yourself in this position or just want to know what GPU is in your system, keep reading to learn how to locate the GPU on a Windows 11 PC.
In Windows 11, how can I check my graphics card?
 There are a few options for determining which Graphics Card is installed on your Windows 11 computer. Let’s get this party started.
1. Use Device Manager to check your graphics card.
The Device Manager is the best location to verify what hardware is installed on your machine. The Device Manager displays all of your gear, allows you to check for driver updates, and allows you to activate or disable specific devices as needed.
- Simply press the Windows Key and X keys on your keyboard to access the Device Manager on your computer.
- Simply choose Device Manager from the menu.
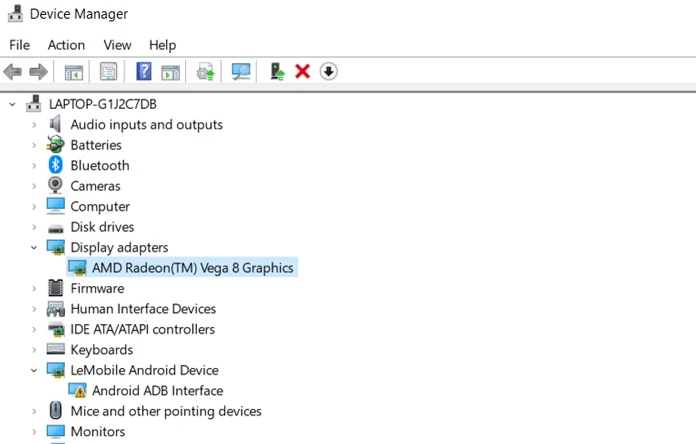
- The Device Manager will now appear on the screen. A list of all the hardware installed on our system will appear.
- Choose from a variety of display adaptors. The names of your GPU will now appear. There will be two listings if you have both a dedicated and an integrated GPU.
- Select properties from the right-click menu on the GPU. Click the Driver tab to view information about your GPU’s driver, including the driver date, driver version, and model.
- If you have a dedicated GPU, you may examine the same information.
2. Use Task Manager to check the Graphics Card
We all know that the task manager is used to monitor how quickly your system boots up, what services are operating, and what applications are starting up as the system boots up. You may also activate or disable starting applications, as well as terminate services that aren’t working properly. You may also look at the hardware specifications.
- Use the Windows + X key or right-click on the Start Button to open the Task Manager in Windows 11.
- Select Task Manager from the context menu.
- Click the Performance tab in the Task Manager once it’s open.
- GPU0 and GPU1 should appear if you have both an integrated and a separate GPU.
- When you click on each GPU option, you’ll see information like the temperature, dedicated GPU RAM, GPU model, and current GPU use.
- Details such as the driver version and date of installation will also be shown.
3. Use the DirectX Diagnostic Tool to check your graphics card.
- To use the DirectX Diagnostic Tool, press the Windows and R keys at the same time to bring up the Run dialog box.
- Now put dxdiag into the search box and press Enter.
- The Diagnostic Tool will now appear on the screen. The Display tab should be selected.

- The information of your Graphics driver, as well as the specifications of your monitor, will now be shown.
- This easy application provides you with all of the information you need about your system, as well as your GPU.
4. Check Graphics Card Settings in Display Adaptor
You may also use another method to see what graphics card your Windows 11 machine has. Well, using Windows 11 itself, there are a number of methods to discover what GPU you have for free.
- From the Start Menu, choose the Settings app.
- Scroll down the right pane of the Display option until you find Advanced Display.
- Advanced Display should be selected. You’ll now see information about the display, including the GPU it’s linked to.

- Click on the Display Adaptor properties for Display 1 to get additional information about your GPU.
- A window will appear, displaying information about the display adapter, such as total RAM and resolution, as well as the GPU model.
5. Use third-party software to inspect the graphics card
CPU-Z is the finest program to use if you want to learn all there is to know about your GPU. It’s a tiny and light application that provides a wealth of information about your Windows 11 computer. CPU, Memory, RAM, GPU, Caches, and even motherboard specifications are all covered. This is a free-to-use application that is just 2 MB in size.
- Click here to get CPU-Z from the official website.
- It should be installed. It will check for updates after installation and, if any are available, will download and install them.
- On the desktop, there will be a shortcut to the application. It should be opened.
- You’ll now notice a plethora of tabs, each with its own set of information.
- Select the Graphics tab from the drop-down menu. Everything will be shown here. It will display the model, sub-vendor, clock speed, and memory.
- You’ll be able to view the details of your dedicated GPU as well.
- There is one more thing. The software can also identify fake GPUs, and if one is detected, it will show Fake.
Conclusion
That’s all there is to it. There are many basic and straightforward methods for determining what GPU is installed in your Windows 11 machine. If you know of any additional ways that aren’t included here, please share them in the comments. Also, tell us which technique you believe is the quickest and simplest to locate.
Also look at:
Frequently Asked Questions
How do I know if my graphics card is compatible with Windows 11?
You can check the system requirements for Windows 11 to see if your graphics card is compatible.
How can I tell what graphics card is in my PC?
The easiest way to tell is by looking at the back of your PC. If you see a sticker with a number on it, thats your graphics card.
How do I find out what graphics card I have Windows 10?
You can find out what graphics card you have by going to the Graphics tab in the settings menu.
Related Tags
- windows 11 system requirements checker
- windows 11 download
- shortcut key to check graphics card
- windows 11 release date
- windows 11 processor requirements


